Production deployment
Production deployment assumes a multi node Kubernetes cluster.
The entity service has been deployed to kubernetes clusters on GCE, minikube and AWS. The system has been designed to scale across multiple nodes and handle node failure without data loss.
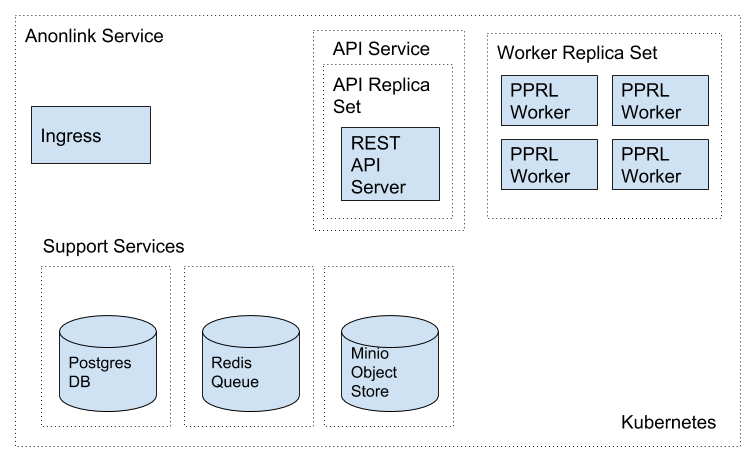
At a high level the main custom components are:
- ES App - a gunicorn/flask backend web service hosts the REST api
- Entity Match Worker instances - uses celery for task scheduling
The components that are used in support are:
- postgresql database holds all match metadata
- redis is used for the celery job queue and as a cache
- (optionally) minio object store stores the raw CLKs, intermediate files, and results.
- nginx provides upload buffering, request rate limiting.
- an ingress controller (e.g. nginx-ingress/traefik) provides TLS termination
The rest of this document goes into how to deploy in a production setting.
Provision a Kubernetes cluster
Creating a Kubernetes cluster is out of scope for this documentation. For AWS there is a good tutorial here.
Hardware requirements
Recommended AWS worker instance type
is r3.4xlarge - spot instances are fine as we handle node failure. The
number of nodes depends on the size of the expected jobs, as well as the
memory on each node. For testing we recommend starting with at least two nodes, with each
node having at least 8 GiB of memory and 2 vCPUs.
Software to interact with the cluster
You will need to install the kubectl command line tool, and helm
Cluster Storage
An existing kubernetes cluster may already have dynamically provisioned storage. If not,
create a default storage class. For AWS execute:
kubectl create -f aws-storage.yaml
Dynamically provisioned storage
When pods require persistent storage this can be dynamically
provided by the cluster. The default settings (in values.yaml)
assumes the existence of a "default" storageClass.
For a cluster on AWS the aws-storage.yaml resource will dynamically
provision elastic block store volumes.
Install Helm
The entity service system has been packaged using helm, there is a client program that needs to be installed
At the very least you will need to install tiller into the cluster:
helm init
Ingress Controller
We assume the cluster has an ingress controller, if this isn’t the case first add one. We suggest using Traefik or NGINX Ingress Controller. Both can be installed using helm.
Deploy the system
Helm can be used to easily deploy the system to a kubernetes cluster.
From the deployment/entity-service directory pull the dependencies:
helm dependency update
Configuring the deployment
Create a new blank yaml file to hold your custom deployment settings my-deployment.yaml.
Carefully read through the default values.yaml file and override any values in your deployment
configuration file.
At a minimum consider setting up an ingress by changing api.ingress, change the number of
workers in workers.replicaCount (and possibly workers.highmemory.replicaCount), check you’re happy with
the workers’ cpu and memory limits in workers.resources, and finally set the credentials:
postgresql.postgresqlPasswordredis.password(andredis-ha.redisPasswordif provisioning redis)minio.accessKeyandminio.secretKey
You may additionally want to check the persistent volume storageClass and sizes.
Installation
To install the whole system execute:
cd deployment
helm install entityservice --namespace=es --name="n1entityservice" --values ``my-deployment.yaml``
This can take around 10 minutes the first time you deploy to a new cluster.
Run integration tests and an end to end test
Update the server url by editing the yaml file then create a new job on the cluster:
kubectl create -f jobs/integration-test-job.yaml
To view the celery monitor:
Find the pod that the monitor is running on then forward the port:
kubectl port-forward entityservice-monitor-4045544268-s34zl 8888:8888
Upgrade Deployment with Helm
Updating a running chart is usually straight forward. For example if the release is called es in namespace
testing execute the following to increase the number of workers:
helm upgrade es entity-service --namespace=testing --set workers.replicas="20"
However note you may wish to instead keep all configurable values in a yaml file and track that in version control.
Minimal Deployment
To run with minikube for local testing we have provided a minimal.yaml file that will
set very small resource limits. Install the minimal system with:
helm install entity-service --name="mini-es" --values entity-service/minimal-values.yaml
Database Deployment Options
At deployment time you can configure the deployed postgresql database.
In particular you should set the postgresql.postgresqlPassword in values.yaml.
Object Store Deployment Options
At deployment time you can decide to deploy MINIO or instead use an existing service such as AWS S3. Note that there is a trade off between using a local deployment of minio vs S3.
In our AWS based experimentation Minio is noticeably faster, but more expensive and less reliable than AWS S3, your own mileage may vary.
To configure a deployment to use an external object store, simply set provision.minio to false and add
appropriate connection configuration in the minio section. For example to use AWS S3 simply provide your access
credentials (and disable provisioning minio):
helm install entity-service --name="es-s3" --set provision.minio=false --set minio.accessKey=XXX --set minio.secretKey=YYY --set minio.bucket=<bucket>
Redis Deployment Options
At deployment time you can decide to provision redis using our chart, or instead use an existing redis installation or managed service. The provisioned redis is a highly available 3 node redis cluster using the redis-ha helm chart. Directly connecting to redis, and discovery via the sentinel protocol are supported. When using sentinel protocol for redis discovery read only requests are dispatched to redis replicas.
Carefully read the comments in the default values.yaml file.
To use a separate install of redis using the server shared-redis-ha-redis-ha.default.svc.cluster.local
- helm install entity-service –name=”es-shared-redis”
- –set provision.redis=false –set redis.server=shared-redis-ha-redis-ha.default.svc.cluster.local –set redis.use_sentinel=true
Uninstalling
To uninstall a release called es:
helm del es
If it has been installed into its own namespace you can simple delete the whole namespace with kubectl:
kubectl delete namespace miniestest